|
In the last activity you saw how a capacitor can store varying amounts
of electric charge. Now you can use a capacitor to make a timer for your
the bungee jump scale model you are going to build. The capacitor used
here is 1 microfarad, one-millionth the size of the huge capacitors we
have been using. In addition it is more robust and it is not electrolytic
so you don't have to worry about the voltage across it. It can probably
take 100 V or more of either polarity.
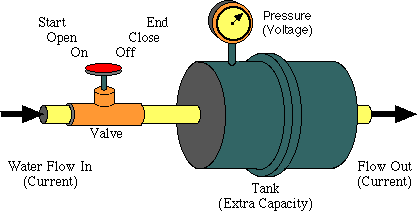
Figure M8
Valve & Tank
The timer works like a tank that is filled through a valve. When the timer starts, a valve opens and water starts flowing into the tank. When the timer stops, the valve closes and no more water flows in. You can read how long the timer was on by the pressure in the tank. (Remember, this kind of tank has a membrane across its center p; look here to see inside.) The pressure will rise steadily for a while and then level out as the back pressure slows in flow of water into the tank. As long as only a small amount of water flows in, the pressure will be proportional to the time. To make this water timer work for longer times, you need to increase the size of the tank and decrease the rate at which water flows in. This is exactly analogous to increasing the size of the capacitor and increasing the size of a resistor that slows the flow of electricity. The idea behind the electronic timer is to get electrical current to flow steadily into a capacitor while the bungee jumper is falling. Through a clever circuit, we arrange for the current to start when the bungee jumper starts and to stop when it falls through a switch. Then the voltage of the charge trapped in the capacitor is related to the time the jumper was falling. A resistor controls the flow of charge into the capacitor. The larger the resistor, the less charge it allows to pass, the longer it takes the capacitor to charge. So, to time long times, you need a large resistor; to time short times, just decrease the resistor.
1. Test your capacitor and meter. This circuit depends on charge being trapped on a capacitor which a voltmeter reads. This only works if the charge stays on the capacitor and does not leak away. There are two ways it can leak off:
You can tell whether you have a suitable capacitor and meter with the following test if your meter can measure both voltage and resistance.
My meter voltage drops until it changes scales to mV around .35 V and
then stays steady. This tells me that the voltmeter does drain off too
much charge until it reaches this scale.
The only reliable voltage readings will be below .35 V.
Depending on your voltmeter, you may have other results.
2. Build the timer. Set up the circuit shown below. S1 and
S2 are switches, in this case they can be simply jumper wires that
you can connect to close the switch and disconnect to open the switch.
R1 is a resistor. You can try different resistors in the circuit,
but for now start with 10 Mohm (brown,black,blue). Measure and record
the resistance of this resistor with your multimeter. C1 is
a capacitor. Again, many different capacitors may work, but start with
a 1 microfarad polystyrene capacitor.
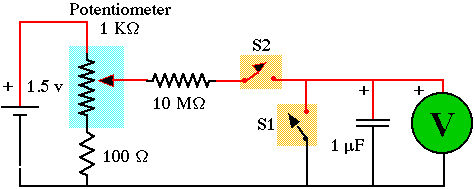
Figure M9
Timing Circuit
3. Turn on the timer. Set your power supply to between 1.5 V
to 3 V. Set your voltmeter to DC volts. Make sure that the positive meter
lead (red) is connected to the positive side of the circuit. With switch
2 closed and switch 1 read the voltage.
This is the power supply voltage and what we will call Vmax because
it is the maximum voltage you can get on the capacitor in this circuit.
4. Experiment with the timer. Start with both switches closed, then
experiment with the switches in different positions. Try opening or closing
them for brief periods of time. Remember, you are going to use this circuit
as a timer. Be sure to record in your journal how the circuit works, and
what each combination of switches does.
An important number is the time constant which is just the product of
the resistance and the capacitance.
(time constant in seconds) = (resistance in ohms) * (capacitance in farads)
Thus, if you use a 10 Mohm (10 million ohms) resistor and a one microfarad
(1 millionth of a farad) capacitor, their product is 10 seconds. The capacitor
will be nearly charged in one time constant. For this circuit to work most
simply, we want to keep the maximum time less than 1/10 of a time constant.
As long as we measure times less than .1 time constant, then the relation
between voltage and time is linear. We can convert the voltage measure
to time with the equation
(time) = (time constant)*(voltage)/(Vmax)
Vmax is the maximum voltage the capacitor will reach after a long time, after many time constants. You measured the resistance of your resistor, so you know it accurately. You don't, however, know the exact value of your capacitor. It may say 1 microfarad, but that may be off by 20%. Since your time measurements depend on the value of the capacitance, this could give a 20% error in your timer. To make your timer accurate you either have to measure the capacitance with a capacitance meter or measure known times with the timer. Because capacitance meters are expensive, we will use the other strategy in the core project.
5. Compare your timer to a stopwatch. Try measuring the same time with a stopwatch and your timer. Use the calculations above to convert your voltage to a time. How does your timer compare to the stopwatch?
Previous Page || Up a Level || Index || Next Page