 |
Hands-On-Physics
ELECTRICITY
|
Core
Project
|
- Analysis and Reporting -
|
Testing the LVPS
Carefully check each component for excessive heat.
If any component is hot to the touch, unplug the circuit and check the wiring.
Three activities are suggested below to evaluate the LVPS; a check of
critical voltages, a test of voltage under load, and a current test.
- Measure the critical voltages with your multimeter
- The transformer output voltage. (The voltage across wires bringing current
to the LVPS from the transformer)
Do you set the meter to DCV or ACV?
- The voltage output of the bridge rectifier.
- The lowest and highest voltage at the output of your LVPS.
- The lowest and highest voltage across the 240 Ohm resistor.
- Test the LVPS with a load
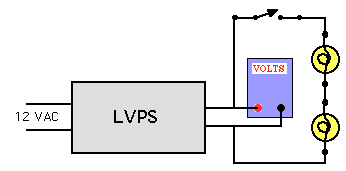
Connect two #47 bulbs in series to the output of your LVPS. Use a
clip lead or a switch so its easy to turn the bulbs on and off.

Figure C7
Test Circuit
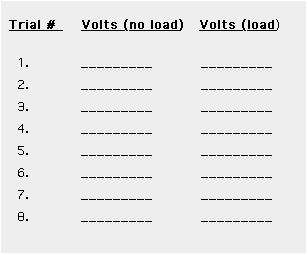
Choose eight voltage settings in your range of output voltages. Set the
voltage before connecting the bulbs. Then record the voltage after the bulbs
are connected (it will be different!). You should make a table of eight
trials, each with a measurement of the voltage with no load (bulbs off)
and the voltage with a load (bulbs on). Record your data in a table like the shown one below.

Figure C8
Table ofo voltages
Graph your data to show how the voltage varies.
Graph voltages vs. trial #, one plot of V with load and
another plot of V without load)
Measure the current through the LVPS
A voltmeter can be made into an ammeter by attaching it across a one-ohm
resistor.
( I = V / R , so if the resistance = 1, the voltage reading = current)
Attach the LVPS, the bulbs, and a one-ohm resistor all in series.
Use the voltmeter to set the voltage of the LVPS and also to measure
the voltage drop across the one-ohm resistor.
- Make this measurement for LVPS settings of
2 V, 3 V, 4 V etc. up to 10 volts.
- Make a table of data.
- Graph your results, plotting current (voltage drop across the one-ohm resistor) vs LVPS voltage.
- Is this graph linear? Should it be a straight line?
Previous Page ||
Up a Level ||
Index ||
Next Page