
|
|
Hands-On-Physics
|
Core
|
- Aircart Construction - |
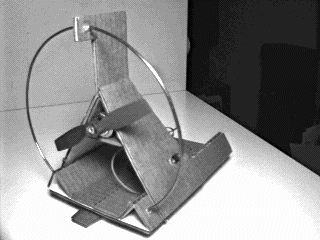
Look at Aircart Sketches
for simple diagrams of an aircart. The design of this
aircart depends on several triangular structures for strength and rigidity;
the beams along the sides of the base and the motor mount. These are all
equilateral triangles, and so have three 60 degree internal angles. During
construction it is important to maintain equal sides and 60 degree angle
so things will fit together nicely. Suggested steps for building an aircart
similar to the one pictured here, are listed below.
1. Dimensioned Drawings
If you want specific measurements for making aircart parts, you can
look at detailed drawings for an aircart.
2. Base
The base may be cut from an
18 cm x 29 cm piece of cardboard. The aircart is build up from this base;
wheels attach to it and the motor is mounted on it. It should be constructed
carefully so all the additions will fit.
3. Sides
The aircart sides form a structure
for attaching the motor. When glued to the base, they form two legs of an
equilateral triangle.
4. Propulsion System:
A motor mount may be constructed
from one piece of corrugated cardboard folded into a triangle. Prepare the
propeller. The hole in the black propeller is too big for the shaft of the
electric motor, but a pop-rivet fits in the propeller hole and will fit
the shaft on the motor. Glue the pop rivet into the propeller and then glue
it onto the motor shaft. Attach the motor mount to the aircart sides with
the propeller facing the back. The propeller should clear everything when
it spins.
5. Assembling the Frame
Glue the sides, with the motor in place, onto the triangular beams of the
base. The back of the sides should be set in 2 cm from the back of the base.
The back of the aircart should form an equilateral triangle with the vertical
propeller guard extending from its apex. The bottom should have holes for
attaching the wheel blocks. A steerable front wheel is recommended.
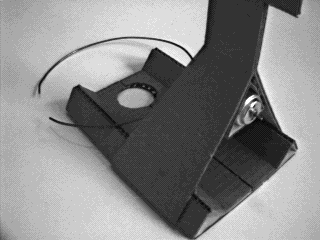
Figure C2b
Aircart frame
6. Wheels:
Pop rivets may be used for bearings in the wooden wheels. Remove the rivet
from its shaft, file off the rough spot, and replace the rivet. The rivet
should rotate smoothly and easily on the shaft. A little oil will reduce
the friction even more. Push a pop rivet into the hole in each wheel. The
shaft of the pop rivet can be glued directly onto wheel blocks cut from
cardboard. The front wheel has a special mount so it can be used to steer
the aircart in a curved or straight path.
7. Steering Assembly:
Attaching the front wheel in a way that will allow the aircart will
move in a straight line is just about impossible, so a steerable front wheel
is recommended. A steering arm
holds the front wheel, and two pivot disks glued to the top of the steering
arm fit up into a circular hole cut in the base of the aircart.
8. Propeller Guard
This aircart design includes a propeller
guard which will help protect the propeller as well as your fingers.
It also improves the structural strength of the aircart. The guard is a
piece of clothes-hanger wire bent into a circle with at radius of 7.5 cm.
Cut the hanger and bend it carefully so it will fit well and look good on
the finished aircart. Mark the plane of the propeller path at the end of
the triangular side beams of the base, as well as on the vertical guard
support. Punch a hole in the vertical guard support and feed the guard loop
through this hole to its center . Clip the ends of the loop, leaving enough
wire (about a centimeter) to stick into holes you punch in the triangular
side beams. Make sure the propeller doesn't hit anywhere, and glue the guard
in place.
9.Wiring:
After the motor assembly has been safely glued in place, you can add a battery
and a switch and then wire it up. Solder two wires to the switch. Cut a
small hole in the frame for the switch. Attach all the electrical components:
battery, switch, and motor, one after the other with wire. This type of
electrical circuit is called
a series circuit. Test your system. If it blows air in the wrong direction,
reverse the wires on the motor.
10. Testing:
Test your aircart on a level surface. How fast will it go in one meter?
How fast in three seconds? Make several tests to be sure your results are
consistent.